Assigning Accessory Animations to Axes
In order to have accessories to be puppeteered by the Controller, you need
to first define the puppeteering data to the accessories via the Builder.
There are three types of animations can be assigned to axes of puppet controller:
Setting Transformation Data
If you want to puppeteer an accessory by merely its transformation
(translation, rotation and scale), then follow the steps below to
set the puppeteering data to it.
-
Attach an accessory to a character (in this case, a mushroom with
spring effect applied on the umbrella).

-
Apply the Builder.

-
Make sure the mesh node of the accessory is activated for puppeteered in
the Assign Node(s) for Controller Handles page.

Please refer to the Assigning Node(s)
for Controller Handles section for more details.
-
Move to the Define Puppet Behavior page.

-
Click on one of the axis, and the page switches to edit mode (the
controls in the lower half part of the page will be enabled).

-
Make sure the accessory is selected (you may click the button or buttons
labeled Quick Select Handle Target
to quickly get the accessory picked).
-
Use the Move
 ,
Rotate
,
Rotate  or
Scale
or
Scale  tool to
translate the accessory.
tool to
translate the accessory.

-
Click the Apply button to save the last translation data to the axis and
leave the edit mode.

|
Note:
|
|
-
Apply: Save the defined translation,
posture and material status of the accessory.
-
Reset: Retrieve the original status of the
accessory.
-
Clear: Remove the data saved in the axis and leave the editing mode.
-
Cancel: Abort the procedure and give up the editing result.
|
-
Repeat the same steps to individually save different status of the accessory to other axes.

-
Click the OK button to save the results to the accessory and leave the task.
-
Use the Controller to puppet the accessory for
generating animations.
Setting Posture Data
If the accessory does have bone structure and you want it to be puppeteered
with different postures, then follow the steps below to
set the puppeteering data to it.
-
Make sure you have create a bone-skinned object in 3D tools (in this
case, Maya).

-
Convert the object into
iClone as a prop via 3DXchange.
-
In iClone, attach the prop to a character (in this case, a
dummy character provided by the Avatar Toolkit Vol. 2 content pack) to
turn it into an accessory..

The accessory in this case has been transformed for fitting the size of the character.
-
Apply the Builder.

-
Make sure the bones of the accessory is activated for puppeteered in
the Assign Node(s) for Controller Handles page..

Please refer to the Assign Controller Handles section for more details.
-
Move to the Define Puppet Behavior page.

-
Click on one of the axis, and the page switches to edit mode (the
controls in the lower half part of the page will be enabled).
-
Make sure the accessory is selected (you may click the button or buttons
labeled Quick Select Handle Target
to quickly get the accessory picked).
-
Use the Edit Animation Layer panel to select target bone of the accessory.

-
Use the Move or
Rotate tool to
offset different bones to generate a posture for the accessory.

|
Note:
|
|
Please note that the bone-scaling method is not support
in iClone, therefore, you are NOT allowed to use
the Scale
tool to resize the selected bones in the
Edit Animation Layer.
|
-
Click the Apply button to save the last translation data to the axis and
leave the edit mode.
|
Note:
|
|
-
Apply: Save the defined translation,
posture and material status of the accessory.
-
Reset: Retrieve the original status of the
accessory.
-
Clear: Remove the data saved in the axis and leave the editing mode.
-
Cancel: Abort the procedure and give up the editing result.
|
-
Repeat the same steps to individually save different postures of the accessory to other axes.

-
Click the OK button to save the results to the accessory and leave the task.
-
Use the Controller to puppet the accessory for
generating animations.
Setting Material Data
In addition to the transformation and the postures, you are able to set the
material data to the accessory for puppeteering with the Avatar ToolKit
Builder so that you can create material animations by classic
puppeteering behavior.
-
Attach an accessory to a dummy character provided by the Avatar
Toolkit Vol. 2 content pack.

-
Apply the Builder.

-
Make sure the mesh node of the accessory is activated for puppeteered in
the Assign Node(s) for Controller Handles.

Please refer to the Assign
Node(s) for Controller Handles section for more details.
-
Move to the Define Puppet Behavior page.

-
Click on one of the axis, and the page switches to edit mode (the
controls in the lower half part of the page will be enabled).
-
Make sure the accessory is selected (you may click the button or buttons
labeled Quick Select Handle Target
to quickly get the accessory picked).
-
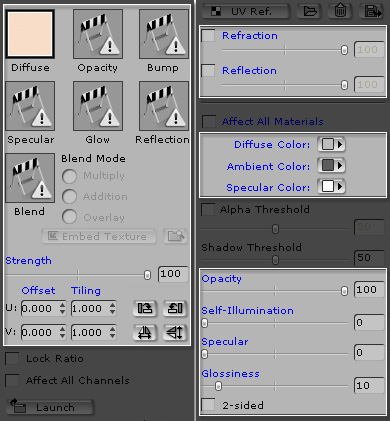
In the Material Setting section of the Modify page, change
the Ambient color of the accessory.

|
Note:
|
|
Please note that values in parameters marked in blue (key-able) in the
Texture Settings and
Material Settings sections can be saved to the axes as puppeteering data.
|
-
Click the Apply button to save the last translation data to the axis and
leave the edit mode.
|
Note:
|
|
-
Apply: Save the defined translation,
posture and material status of the accessory.
-
Reset: Retrieve the original status of the
accessory.
-
Clear: Remove the data saved in the axis and leave the editing mode.
-
Cancel: Abort the procedure and give up the editing result.
|
-
Repeat the same steps to individually save different status of the accessory to other axes.

-
Click the OK button to save the results to the accessory and leave the task.
-
Use the Controller to puppet the accessory for
generating animations.


